Introduction to this Workbook
This book is a collection of workshops and presentations that are hosted by the North Seattle College Computer Science Club. Each chapter represents a separate workshop or presentation.
If you discover any typos, out of date images, or broken links please open a bug ticket or email the club. Pull Requests are accepted by anyone from the club so if you do log the ticket feel free to assign it to yourself and make the correction. Your contributions to the club are greatly appreciated!
If you have an idea for a workshop please reach out to leadership on the Discord channel.
Thank you and enjoy!
Git and GitHub Workshop
Purpose
This is a crash course in Git and GitHub with the intent on providing enough information so that a student may begin to use Git for their personal projects and more importantly to begin to collaborate with others. This will just touch the surface and will not go into detail about troubleshooting. When issues arise, and they will, we hope the that the club can be a helpful resource to help troubleshoot along with the usual internet sources.
Git
The most used distributed version control system in use today. Git tracks changes in files and allows for multiple people to work on the same codebase.
GitHub
A platform and cloud-based service for software development that uses Git. GitHub offers feature rich free accounts and currently students qualify for Pro accounts. The platform is a great way to get started with version control and to begin to collaborate with your fellow students.
Git Started
Install Git
MacOS
Install Homebrew
brew install git
Windows
Linux
Install with the distribution's package manager.
Configure the CLI
Prerequisites
- GitHub username
- GitHub email
git config --global user.name <username>
git config --global user.email <email>
Git Basics
Keywords
- stage - add a file to be committed
- commit - The state of the repository at this point in time is saved
- checkout - Refers to the creation or switching between branches or commits.
Concepts
Git is a version control system that allows one or more people to manage different versions of a repository. A repository can be though of as a project directory. A repository contains documents like text, code, and configuration files as well as images. The repository, often referred to as a "repo", also contains the change history called a commit history. Each commit is a saved version of the repo at that point in time. You can think of a commit history as a series of backups.
Basic Commit History

Create A Local Repository and Make a Commit
- Mac/Linux open a terminal
- Windows open Git Bash
- Create directory
- Navigate through the terminal to the root of the directory
- Type
git init - Create a file called first-markdown.md and open it in your favorite text editor/IDE
- Write something in the file and save it
- In the terminal type
git statusgit add first-markdown.mdgit statusgit commit -m "Some message here about what you did."git log- Repeat these steps. On each iteration attempt to new files, edit existing files, and/or delete files
TODO do a revert
Basic Commands
git init                        Creates a new git repository
git status                      Show status of staged/unstaged files
git diff                        See changes to the file compared to most recent commit
git add <file_name>             Add file to commit (stage it)
git commit -m "<message>"       Commit files with clear message about commit
git log                         Display a list of commits
git revert <commit id>          Revert the commit with provided id
GitHub Basics
Keywords
- clone - Copy a repository from GitHub to your local machine
- branch - A version of the code that deviates from the branch it originated from
- Pull Request - A request to merge one branch into another
- conflict - When git cannot resolve a merge without manual intervention
Concepts
GitHub is a place to store repositories, share them with other GitHub users, and collaborate with others on projects. GitHub involves the Git installed on your computer to host a local version of the repository on your computer. When you have committed changes you will push your commit history (think upload) to the GitHub platform.
Multiple Branch Git History
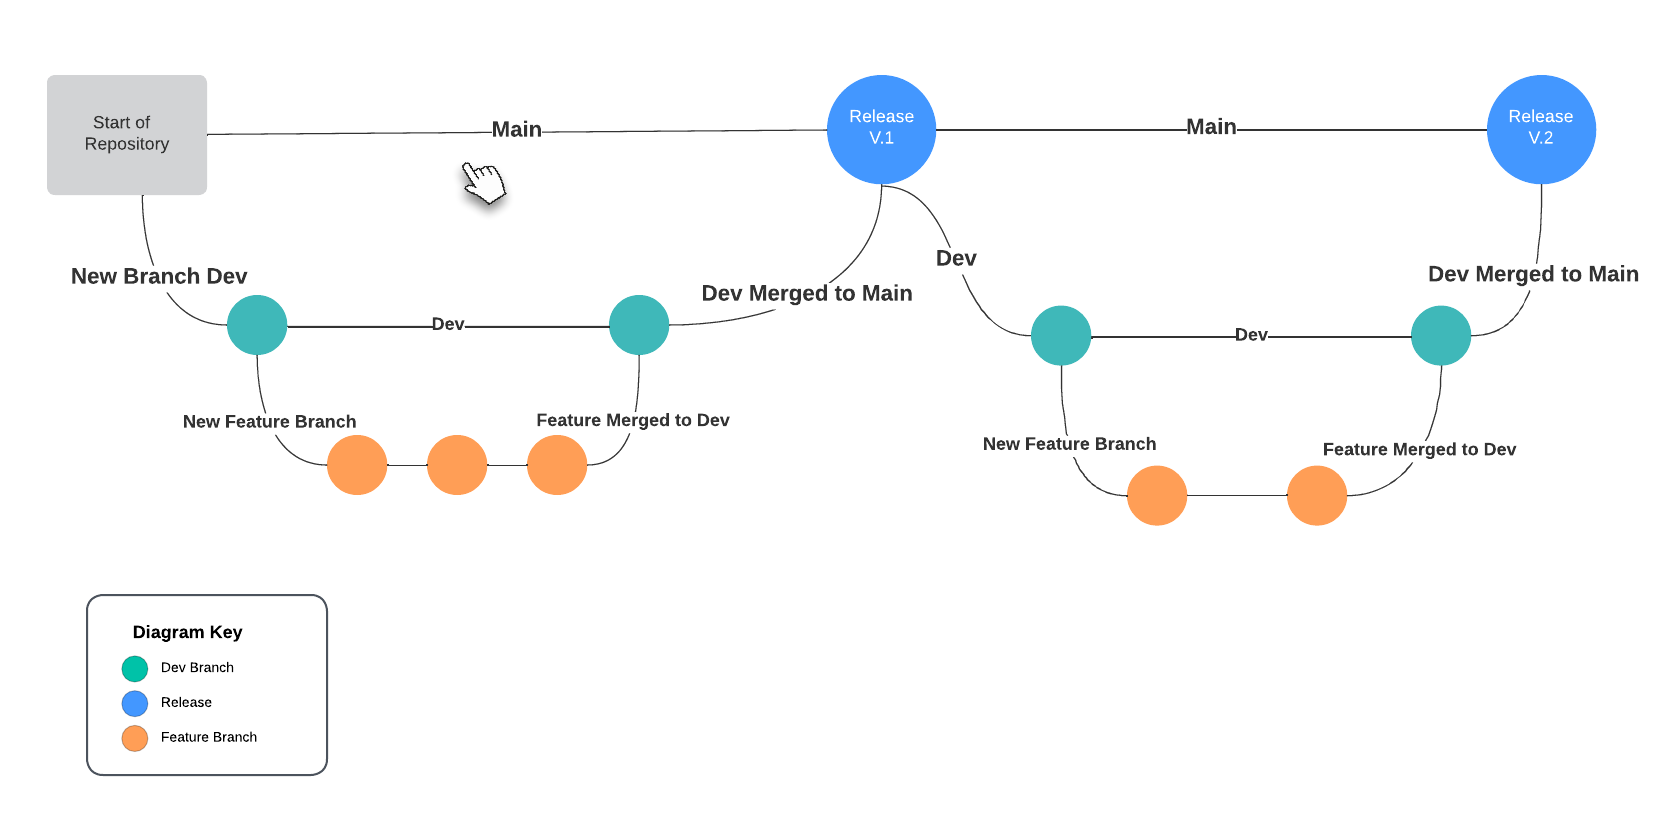
Create a Repository on GitHub and Push a Commit
Login to GitHub then create a new repository

and give it a name, or use the suggested name, then select the option to add a README.md. After the repository has been created navigate to the drop-down seen below
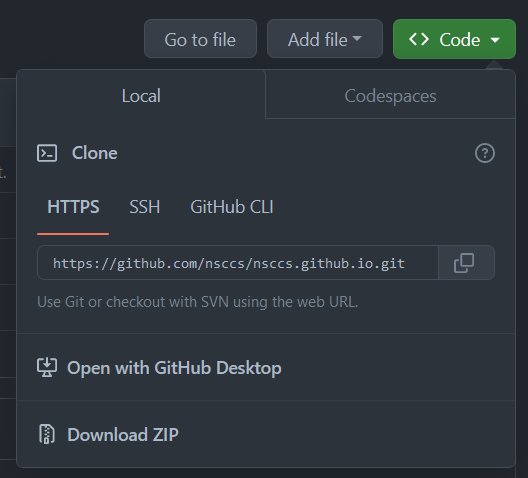
Copy the link to the clipboard and return to a terminal and type
git clone https://github.com/username/repository
A new repository now exists. Change directories into the new repository and open it in your text editor/IDE of choice.
Now the same commands used for Git that were covered previously may be used to track changes within this repository. However, it is time to introduce the concept of a branch.
git checkout -b new-feature
As long as you don't change anything on this branch you can switch back to the main branch with
git checkout main
then switch back
git checkout new-feature
However, once changes are made within your new-feature branch you may not switch to other branches without first committing those changes.
Make some changes to your readme and commit them. Now to upload these changes to the remote repository you will push the changes with the git command line tool.
git push origin new-feature
You have successfully uploaded your code and commit history to the remote repository!
The Pull Request
The last piece of the puzzle is the Pull Request. Could you have done the above steps directly on the main branch? Yup, but it is generally frowned upon and most repositories you will encounter in the wild will have restrictions that do not allow directly pushing to main.
A Pull Request is an intermediary step that allows you and the people you collaborate with a chance to review your work, test it, and offer constructive feedback. Changes might be requested before the new feature can be merged into the main codebase. There are other actions that can be configured at this stage that are out of scope for this workshop.
Navigate back to your remote repository in the browser and select the Pull requests option from the tabs that start at the left.

Press the big green button that says New pull request and you will be presented with two dropdown menus. On the left is the branch you want to merge your work into and the right is your feature branch.
Select main on the left dropdown and new-feature on the right. Then click the green button to create the pull request.
Basic Git Commands Used with GitHub
git checkout -b <new-branch-name>        Create a new branch
git checkout <existing-branch-name>      Switch to an existing branch
git add <file_name>                      Add file to commit (stage it)
git commit -m "<message>"                Commit files with clear message about commit
git push <remote> <branch>               Push locally saved commits to a remote
git pull <remote> <branch>               Pull latest state of repository for selected branch
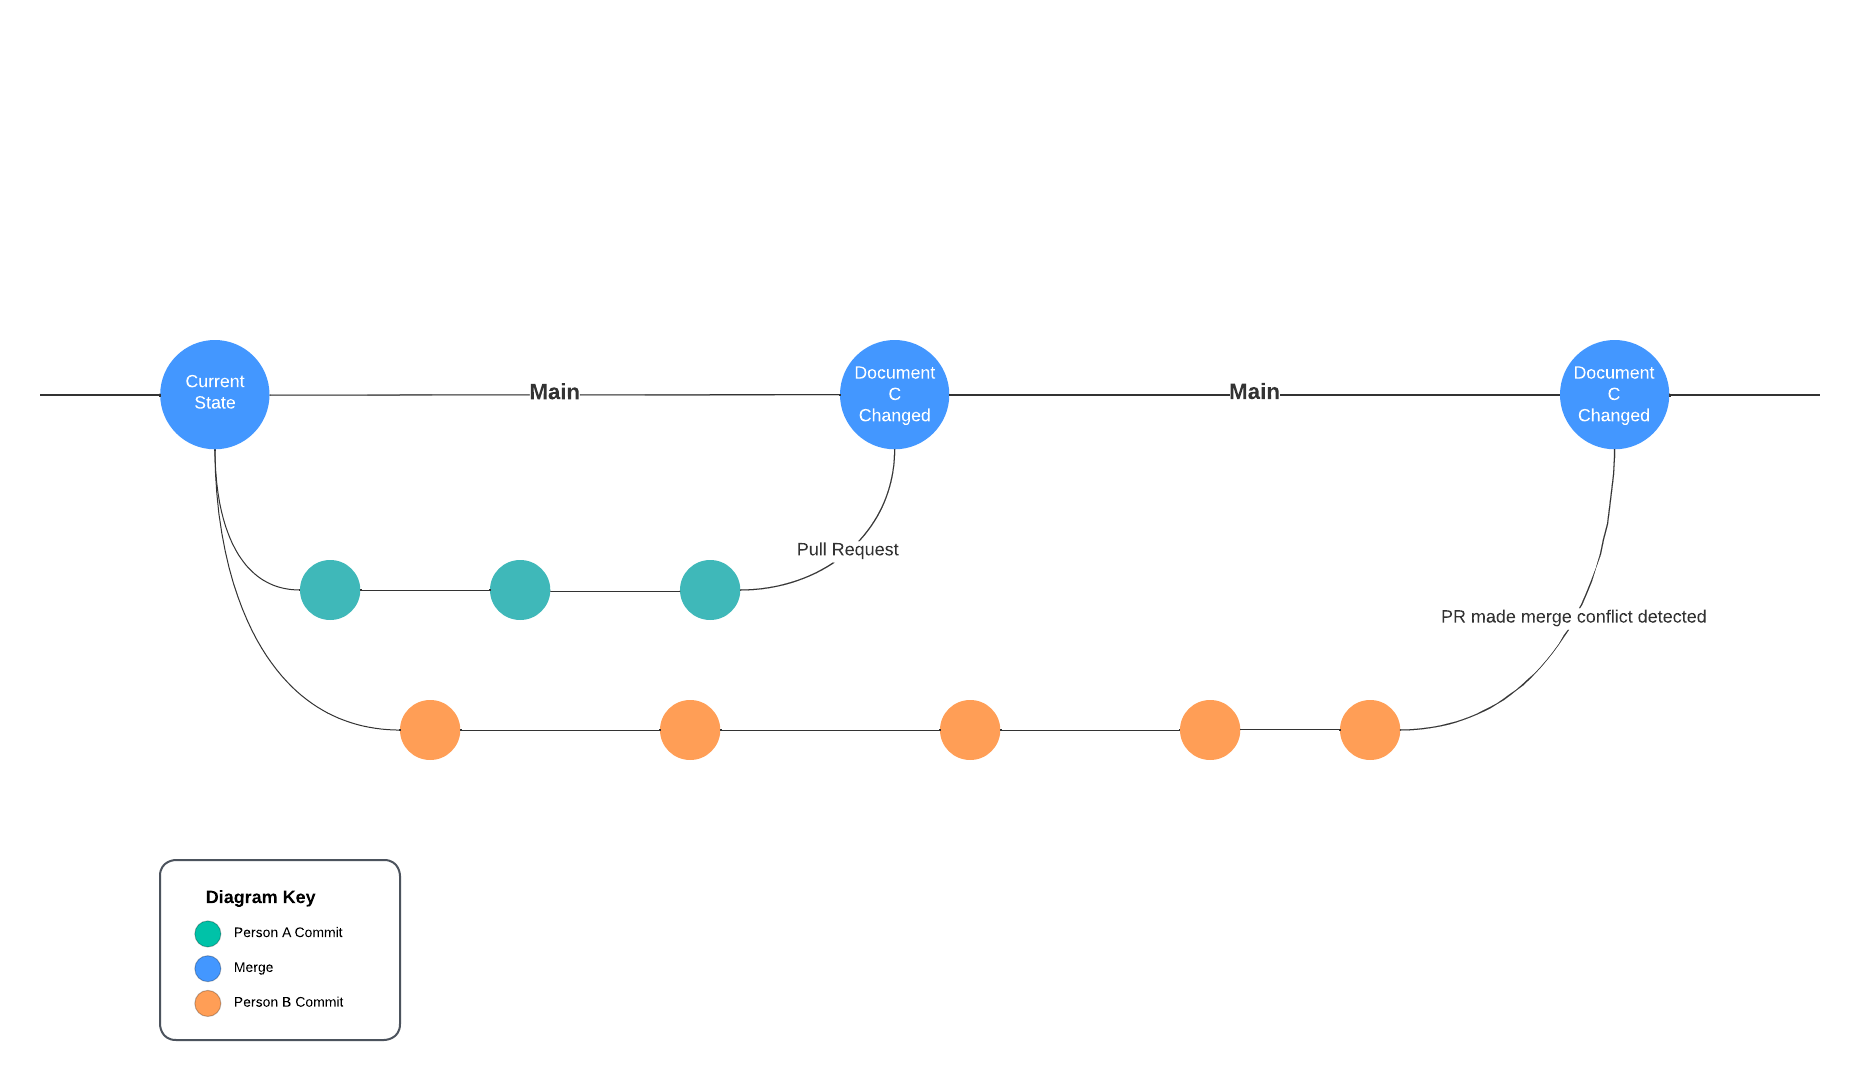
Conflicts
The above layout describes scenarios where everything goes well. There are often scenarios where this does not occur. One of the most common issues that arises is when more than one person work on a single document. Person A and Person B create their own new branches off of the main branch. Both Person A and Person B will work with Document C. Person A finishes their work and submits a PR which is approved and merged into main. Then Person B does the same. At this point Document C in main has been changed since Person B originally created their branch. Person B's PR will have a conflict, and it will need to be resolved manually.
Merge Conflict Git History
There are various ways to solve merge conflicts within GitHub's platform as well as locally. Reach out for help, search the web, and don't panic!
Contribute to Other Projects
Put it all together
This has all been a lead up to contributing to projects that are hosted in the NSCCS organization. With just a few more steps you will be able to contribute to this and any other public repository on GitHub.
Keywords
fork - Copy of a repository that exists in your GitHub space upstream - points to the original repository that you forked
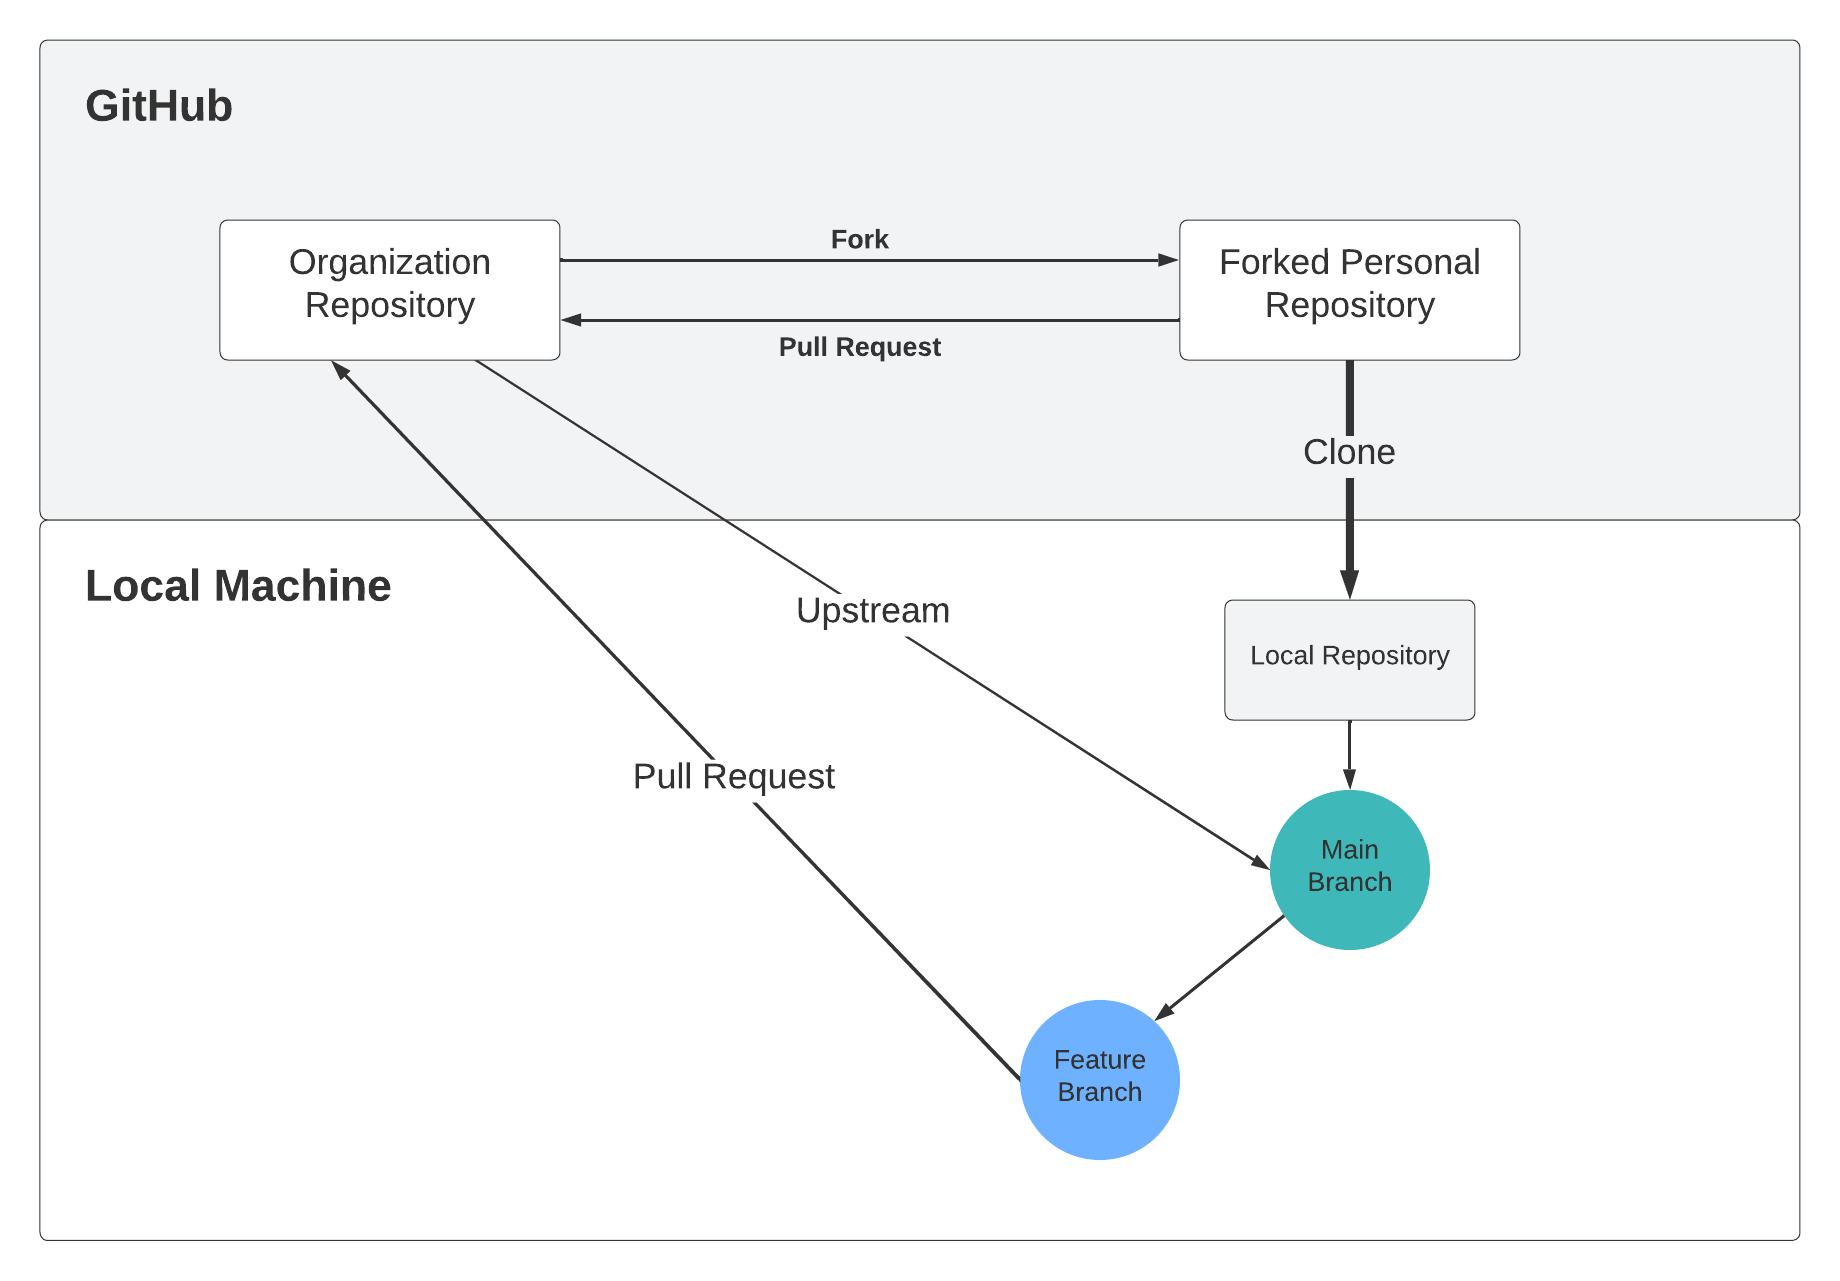
Contribute to a Repository on GitHub
The last concept for this workshop is called a Fork. A fork of a repository is a copy of that repository in your own GitHub space.
To make a contribution to the original project you first fork the original repository. We will use this one.
Then configure the upstream remote
git remote add upstream https://github.com/nsccs/ForkPracticeCareerPrep.git
# Then verify
git remote -v
The rest is what was previously covered:
- Clone your copied (forked) repository to your local computer
- Create a feature branch to do your work
- Create PR of your complete work from your feature branch into the upstream branch
- Anxiously await feedback
You have just made your first contribution to an open source repository!
Check the club organization for ongoing projects that you might want to get involved with. If you have ideas please list them on Discord and invite people to contribute.